Decorating gingerbread houses is a time-honored tradition in many households. The distinctive aromas of ginger and cinnamon wafting through the house as the cookies bake, the delight as the walls and roof are assembled and the 2D cookies transform into a 3D house, the cornucopia of colorful candies waiting to be attached to the house, and nibbled during construction. Each year brings with it the desire to decorate the houses more realistically and beautifully than the previous years. And it seems that many candies were at least unconsciously designed as gingerbread house decorating elements. Necco wafers perfectly shingle the roof, Tootsie rolls are idea for logs, and sugar cones are the perfect shape for forming evergreen trees.
The problem becomes having too many different candies and not enough gingerbread real estate on which to place it all. The meticulously crafted shed is crowded by the blue tinted skating pond which is perilously close to the fence row that would make it impossible to fully open the front door. Forget the perfectly cut and stacked log pile unless the cookie constabulary doesn’t mind it neatly stacked on the municipal sidewalk. A larger board would certainly alleviate the crowding, but then logistically, the entire thing would need a permanent home: the dining room table. This may or may not be feasible in your home.
A grand scene aside, there are a few things that separate gingerbread cookies from gingerbread house cookies. Structural integrity is paramount, so these cookies may not be palatable after baking. Aside from the extra flour to stiffen the dough, they should be slightly overbaked and then allowed to go stale. Leavening agents, which would make the cookies light and soft are kept to a minimum in construction pieces which are generally rolled much thicker than a cookie meant for consumption.
Even more flour will end up in these cookies when they are rolled out. Since our primary objective is building, tough cookies won’t matter. In fact, that’s what we’re after. It’s also important that all the pieces be the same thickness. Afterall, what good does the roof do if it’s rolled too thin to support the decorations. Or worse, cracks and breaks when it’s handled for assembly. Rolling pin guides, rubber or silicone ring pairs of varying thickness that are placed on the ends of a rolling pin ensure the proper and consistent thickness of each piece. Most houses are rolled somewhere between 3/8 and 5/8 of an inch thick depending on how large the finished house will be.
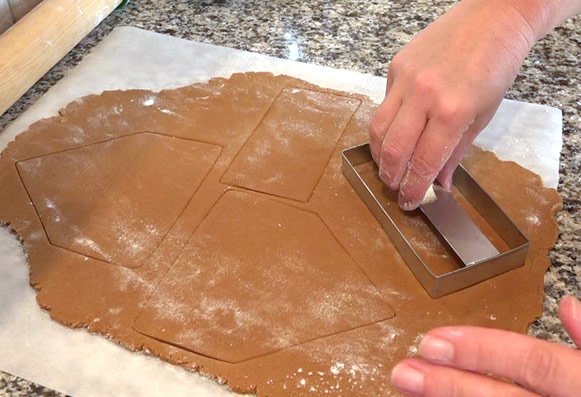
Which leads us to the next point: house pieces. Back in the day, each house piece was cut from the dough using a pattern piece and either a knife or wheel cutter. This allowed for multiple house designs, precut windows and doors and other unique features such as texturing to be baked into the house pieces themselves. But this is time consuming and labor intensive. If you’re only making one house, this is the way to go. But if you are planning a decorating party, it’s enough to call the whole thing off. Luckily there are house cutter sets that make this process go as quickly as making cookies cutouts. For these houses, the dough should be rolled to 3/8-inch thick. Hand-cut or multi-story houses will need the thicker 5/8-inch dough.
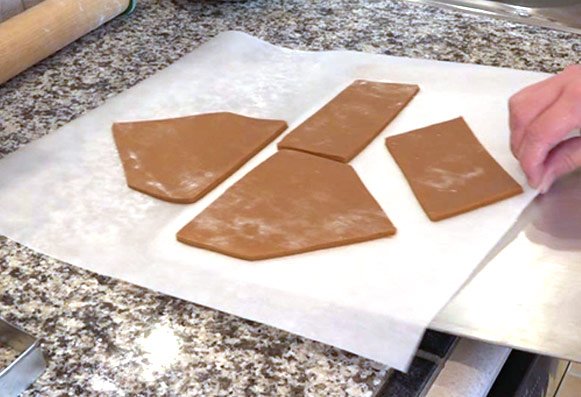
Judiciously used, the dough recipe below will yield three complete houses cut from the house cutter set pictured below. The dough can be rolled directly on a sheet of parchment paper, the house pieces cut, the scraps removed and then the whole kit ‘n caboodle can be slid onto the baking sheet for minimal handling of the house pieces. It’s easier, cleaner and preserves the shape of the pieces perfectly.
But we’re not done yet. Thick pieces and floury, tough cookies are only part of it. Time is the second part. More time, in fact. Once the cookies are baked, they need to cool, dry and harden completely. This is best accomplished over a few days of open countertop resting, preferably on a cooling rack to ensure air can reach the bottoms of these cookies. Conversely, you can flip them over for a few days of drying on the bottoms. Baking, cooling, assembling and decorating over the course of a week takes considerable pressure off you. Once the house pieces are quite stale, construction can take place. (Marshmallow World, Part 2)
Gingerbread Cookies for Construction
- 5-6 cups all purpose flour
- 1 teaspoon baking powder
- 1 teaspoon salt
- 2 teaspoons ginger
- 2 teaspoons cinnamon
- 1 teaspoon nutmeg
- 1 teaspoon cloves
- 1 cup vegetable shortening, melted and cooled slightly
- 1 cups white sugar
- 1 ¼ cups unsulphured molasses, light or dark
- 2 eggs, slightly beaten
Preheat oven to 375°F. Combine the shortening, molasses, white sugar in a mixing bowl and beat on medium speed with the paddle attachment until the mixture is light in color and completely combined. Add the eggs and beat until combined. Combine the spices and salt in a bowl and mix to combine. Add the spices to the shortening mixture and completely combine. Add the flour, 1 cup at a time until it’s completely combined. The dough should be stiff and no longer sticky.
Roll dough half at a time, on a sheet of parchment paper. Liberally flour the top so the rolling pin doesn’t stick. The dough should be between 3/8 and 5/8-inch thick depending on the overall size of your house. Larger houses should have thicker pieces. Using a bakers pin, fitted with rolling guides will ensure that every piece is the same thickness. Cut out house pieces according to their patterns or by using a cutter set. Remove the scraps to re-roll.
Bake the house pieces for 10-15 minutes or until they begin to brown and are completely set. Overdone (for once) is better for these cookies. Do not allow them to burn, however. Allow the cookies to cool completely and store them flat and uncovered, preferably on a cooling rack for even air flow for 2-3 days or until they are dry and very hard.